Setting up a Development Environment
Getting Started
Setting up the development environment can take a few minutes.
-
Clone
bash git clone https://github.com/matlok-ai/bampe-weights cd bampe-weights -
Install Blender for the Command Line
Follow the Blender Install Guide for how to install and customize the command line version of blender.
-
Install Python Packages
bash pip install -e . -
Download a model.safetensors file
Here is a smaller AI model.safetensors file to download if you do not already have one:
bash wget https://huggingface.co/gpt2/resolve/main/model.safetensors -
Export Environment Variables
With large language models it is very easy to exhaust your host resources (ram) running the bampe-weights development environment. Here are some tips for making it easier:
-
Limit the ROWS and COLS to small dimensions (512x512 is huge for these demos)
-
Limit the number of FACES to render
-
Limit the number of MAX_LAYERS to process from a model.safetensors file
Customize these to help with your hardware.
bash export ROWS=256 export COLS=256 export FACES=20000 export MAX_LAYERS=10 -
End to End Testing
Use this section to validate your environment is working end to end.
Minimize the resource requirements
export ROWS=50
export COLS=50
export FACES=1000
export MAX_LAYERS=3
export FRAMES=5
# automatic shutdown once done
export SHUTDOWN_ENABLED=1
export GIF=./blender/test-50x50.0.gif
# GLTF supports colors
export GLTF=./blender/test-50x50-gltf.0
# STL does not support colors
export STL=./blender/test-50x50-stl.0.stl
Run Test
rm -rf .tmp/*; time blender -p 400 400 800 800 --python ./examples/show-model.py

real    0m6.846s
user    0m7.123s
sys     0m1.667s
ls -lrth blender/
total 16M
-rw-r--r-- 1 bampe bampe 7.1M Dec 14 13:19 test-50x50-stl.0.stl
-rw-r--r-- 1 bampe bampe 7.3M Dec 14 13:19 test-50x50-gltf.0.glb
-rw-r--r-- 1 bampe bampe 998K Dec 14 13:19 test-50x50.0.gif
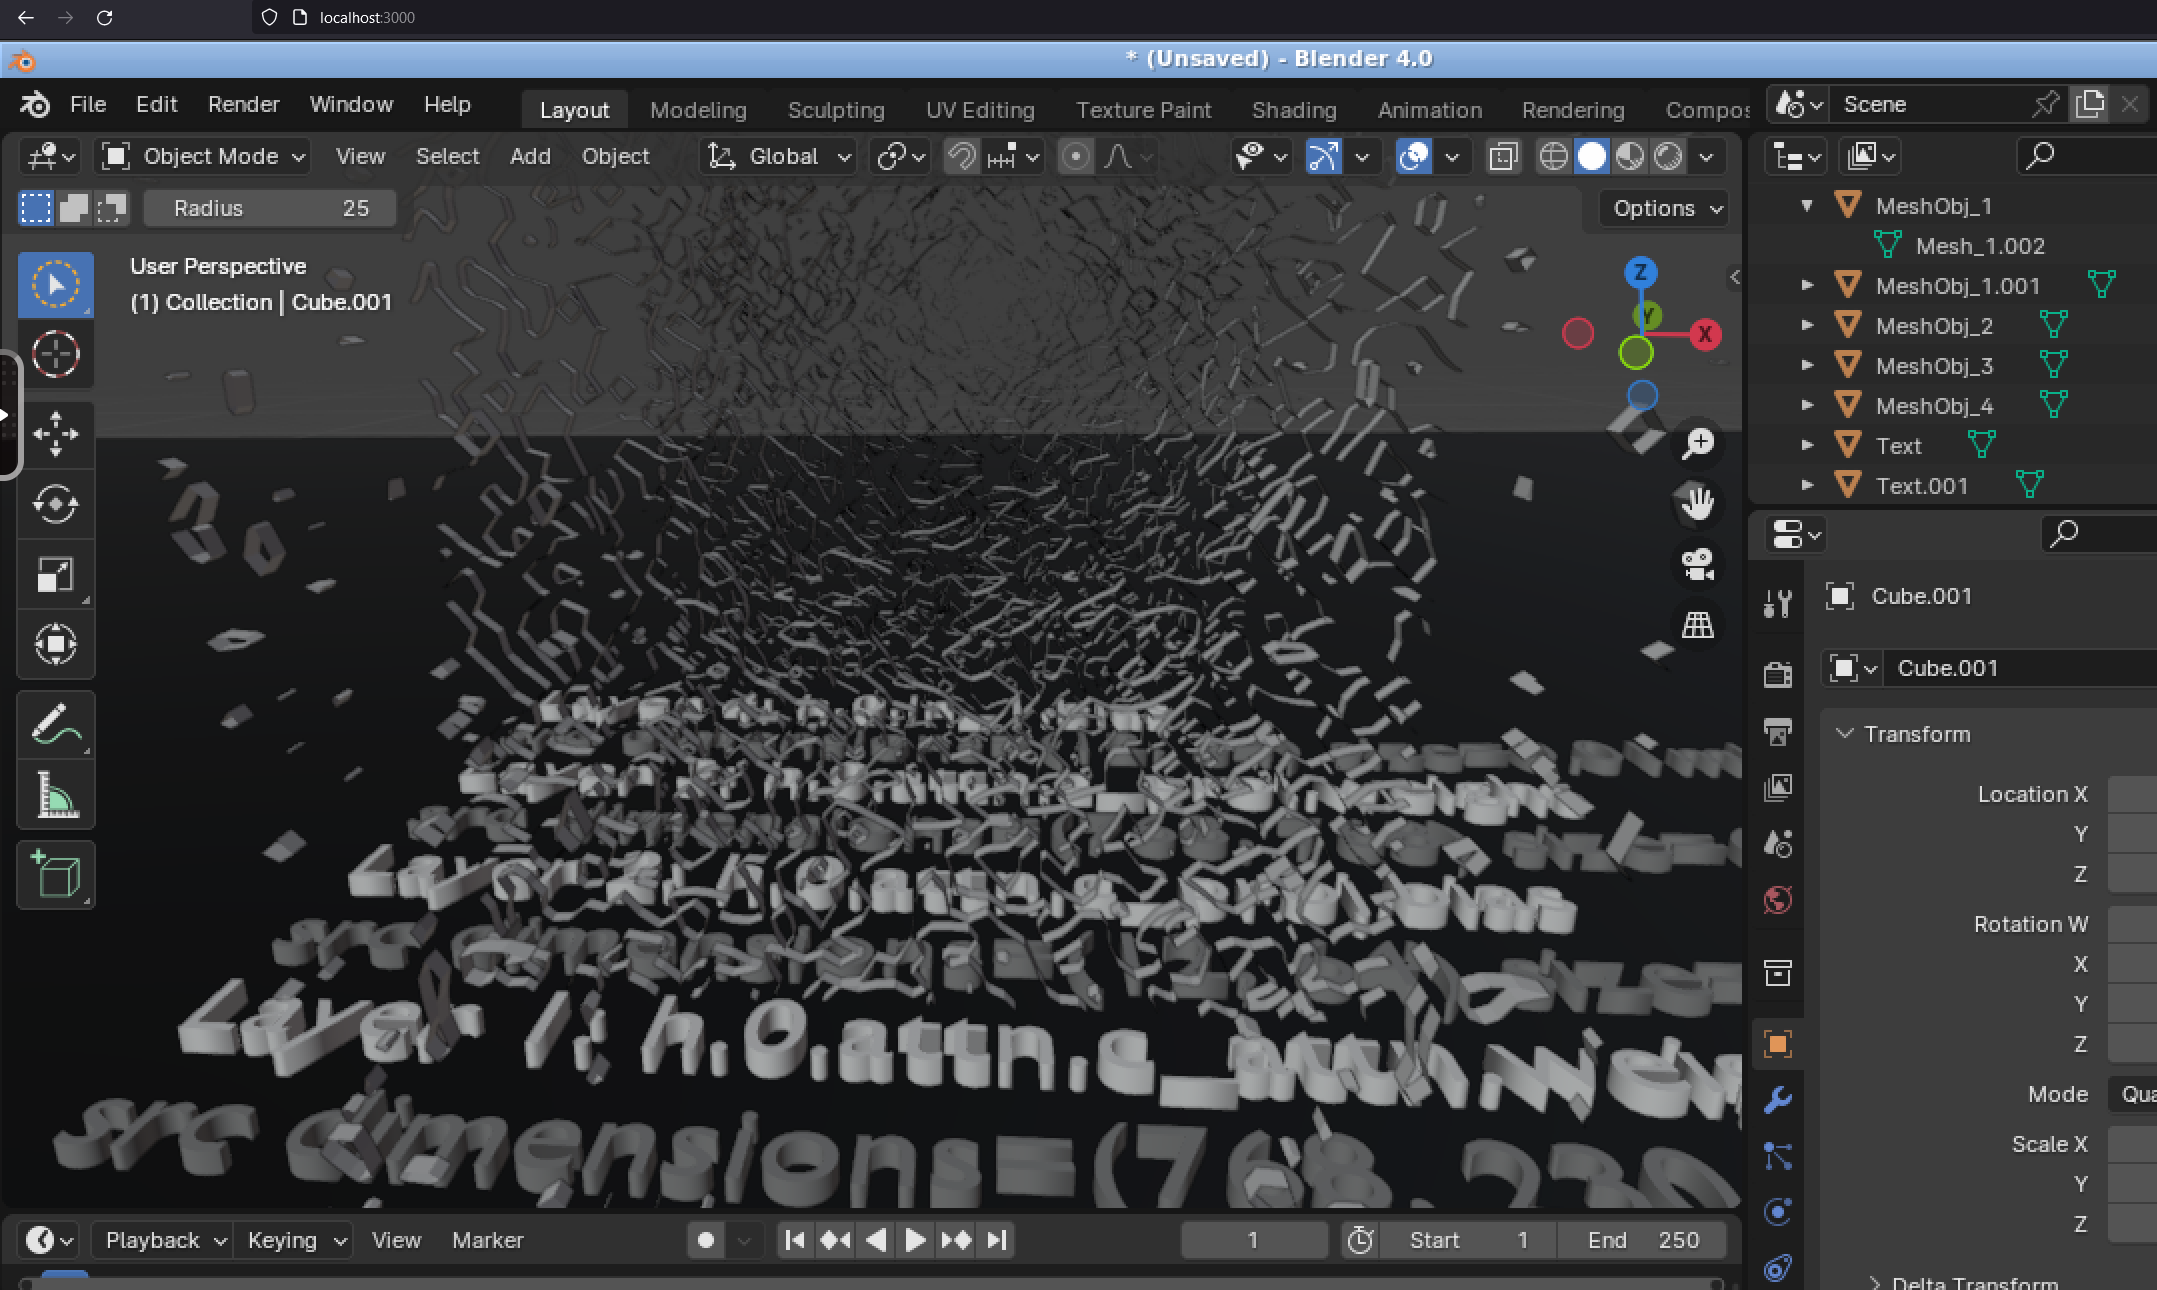
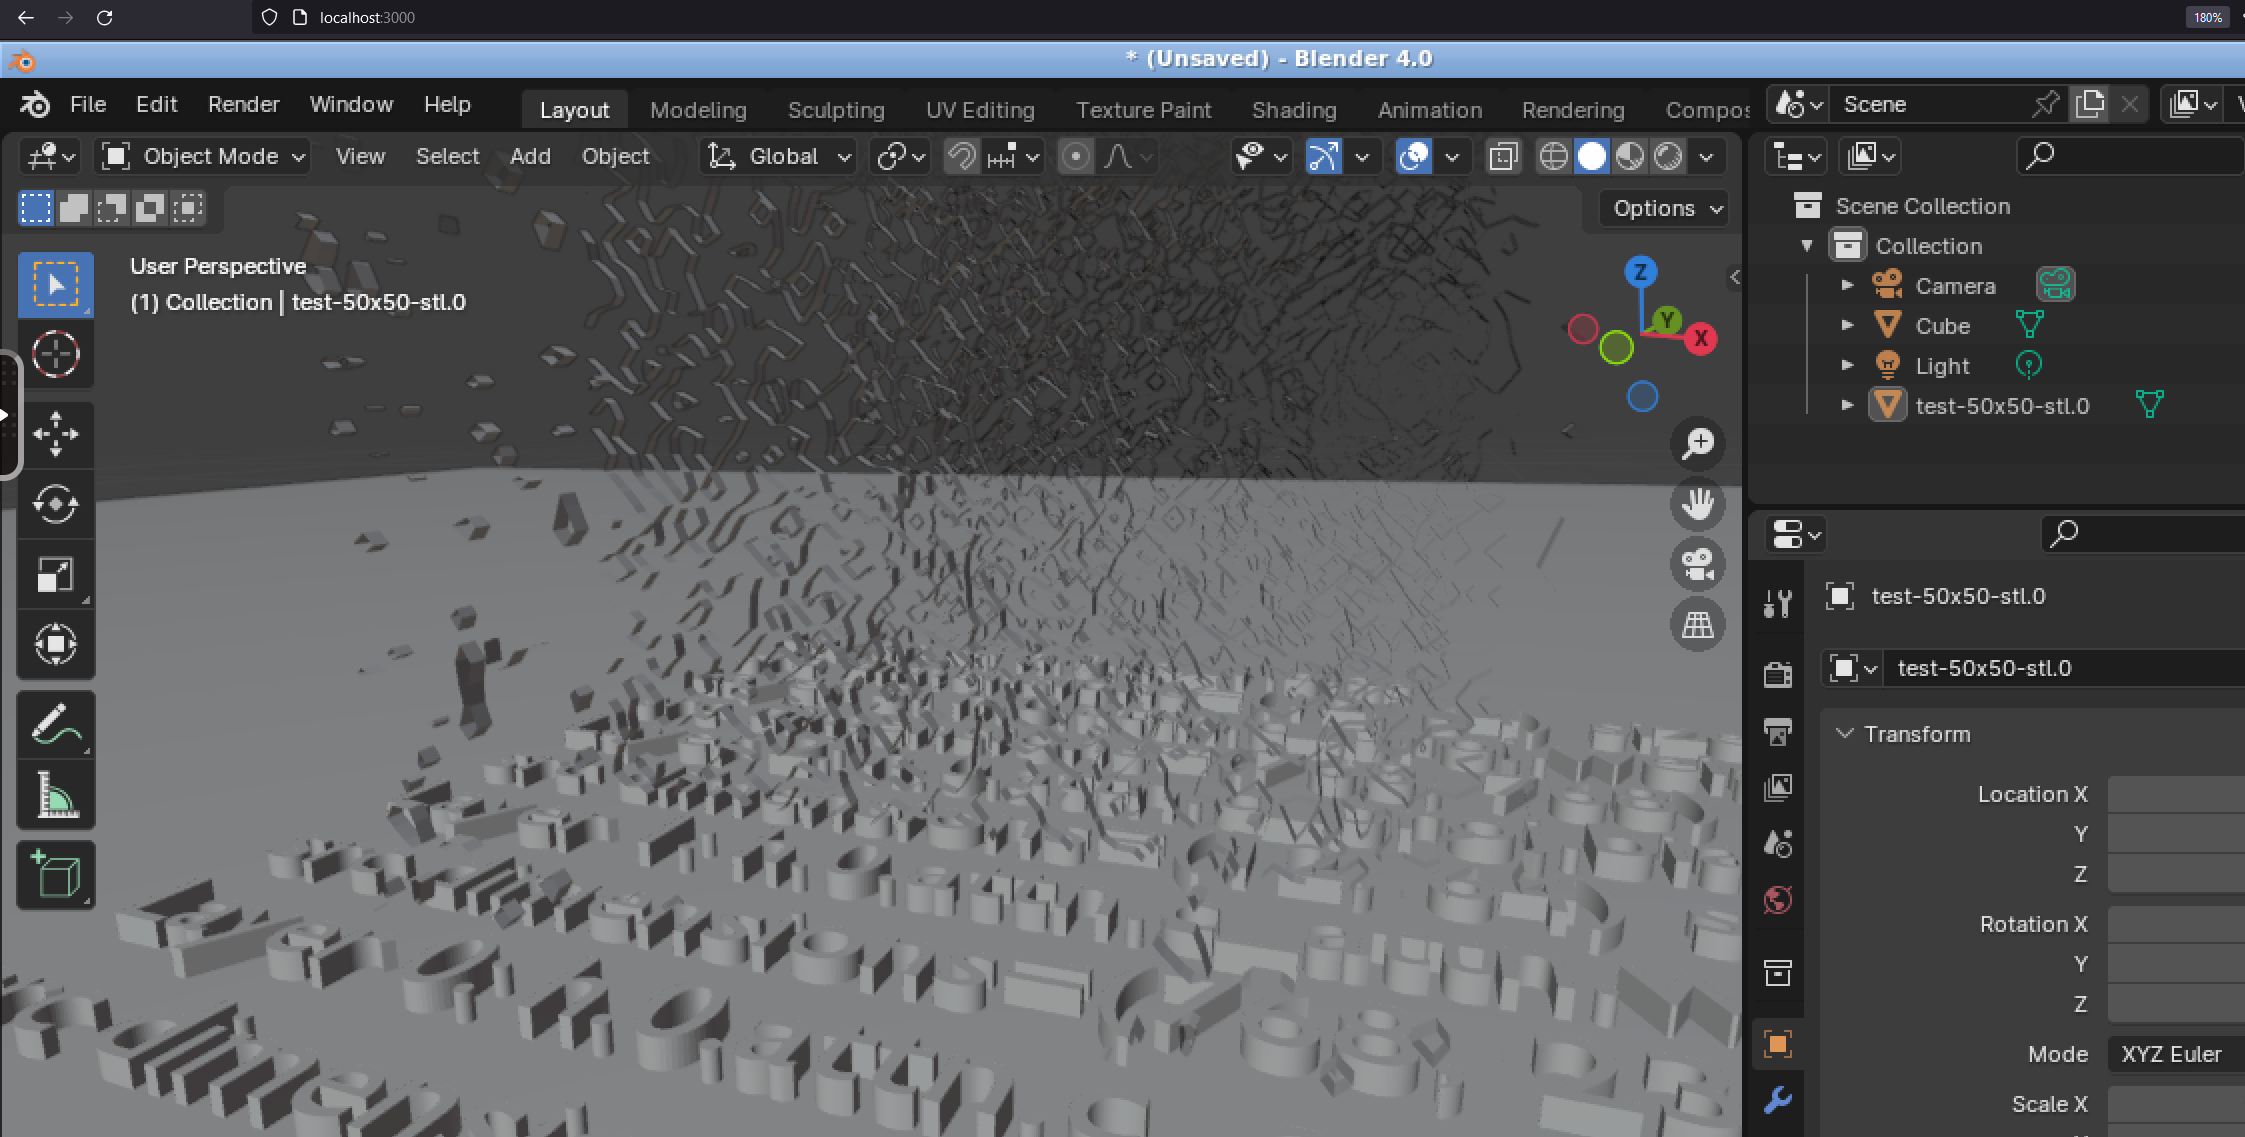
View the glTF GLB and STL files using the Blender Container Image
With the end to end test done you can review the files to see if your system is working.
If you are using a Blender container, then in your browser these files should be in the /config/bampe/ directory once you open the File -> Import -> STL or glTF menu. Here's screenshots showing the test end-to-end gltf and stl files:
-
glTF
-
STL
General Usage
How do I limit the preprocessing and visualization size and reduce the cpu and memory usage requirements?
If you want to further reduce your exported visualization file size and reduce the cpu/memory usage, you can adjust these environment variables before starting Blender:
- ROWS
- COLS
- FACES
- MAX_LAYERS
View a Pre-trained AI Model's Weights using Blender on the Command Line
We have not researched how to get argparse working with Blender's python 3.10 runtime, so please use the environment variables for changing as needed:
export ROWS=256
export COLS=256
export FACES=20000
export MAX_LAYERS=10
rm -rf .tmp/*; time blender -p 400 400 800 800 --python ./examples/show-model.py
Export Animations, STL and glTF files
Export AI Model Visualization as a Flying GIF Animation
# max 24 GB ram can handle
# export FRAMES=60
# easier to debug with a limited number of frames
export FRAMES=5
export GIF=./blender/view-model-layers
rm -rf .tmp/*; time blender -p 400 400 800 800 --python ./examples/show-model.py
Export AI Model Visualization as an STL file
export STL=./blender/model-stl
rm -rf .tmp/*; time blender -p 400 400 800 800 --python ./examples/show-model.py
Export AI Model Visualization as an glTF Binary file
export GLTF=./blender/model-gltf
rm -rf .tmp/*; time blender -p 400 400 800 800 --python ./examples/show-model.py
Export Automation Guide
Please refer to the Export Automation guide
Where did this come from?
Below is the v1 readme with the initial idea.
An Alternative Approach to Building Generative AI Models
This project is an approach for building generative models by extracting model weights then using those weights with another generative AI model to predict new weights for reuse in one or many new generative ai model(s). If proven, this approach would hopefully reduce the traditional expensive training costs and enable faster model vetting with a flexible, stream-lined process.
The bampe-weights repo includes an initial proof of concept for building small, modular weights from a few generative ai model.safetensors files with included benchmarks. In its current state, this PoC is capable of predicting a customizable chunk of predicted weights that you can view to verify whether this idea is feasible or not.
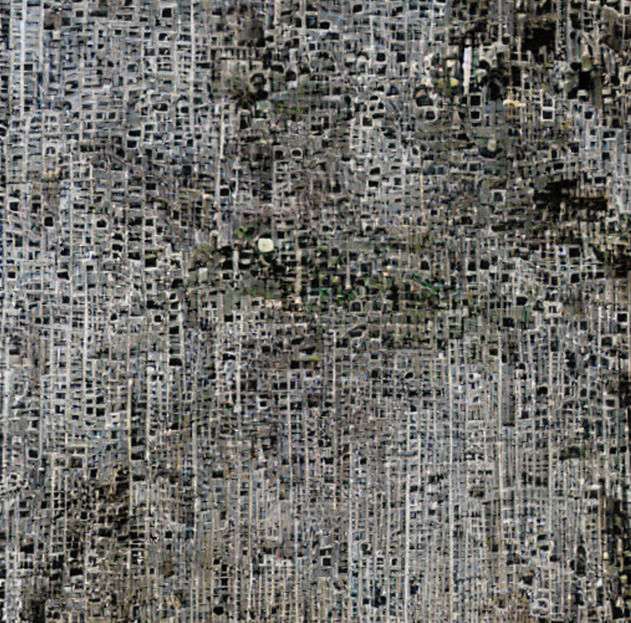
We believe we have found a design pattern for assembling generative ai models faster because our predicted 2d image is visually-similar "enough" to the original multi-dimensional, embedded space tensor image that includes most of the "intelligence" and learning.
Here's the PoC results and dataset so you can download and view with any tool that can view TIFF image files:
Review the input model's sample weights on GitHub

- Source: Tensor Weight as a Tiff file
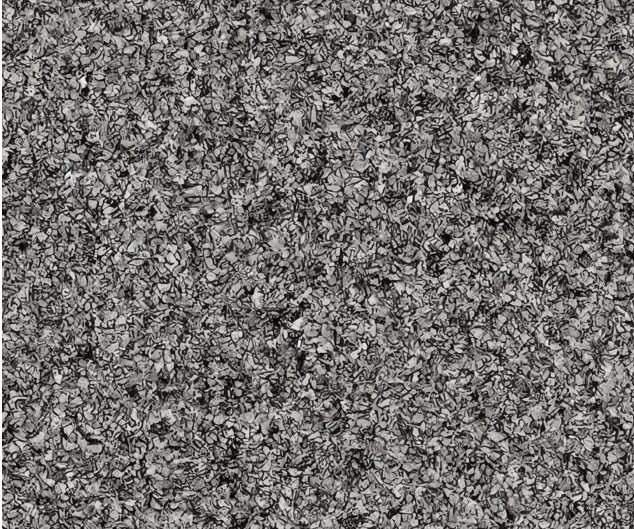
Review the AI's predicted weights on GitHub:
CPU-Generated Predicted Weights
This screenshot is an example of "trained weights" for a new type of foundational generative AI model (called a weight-derived model):
- Source: CPU-generated Tiff
GPU-Generated Predicted Weights
This screenshot is an example of "trained weights" for a new type of foundational generative AI model (called a weight-derived model):
- Source: GPU-generated Tiff
Sample Weights for the PoC
The PoC input sample weights were extracted from the HuggingFace model.safetensors file:
https://huggingface.co/gpt2/tree/main
The results below are available for anyone and let us know if you have any issues trying out the PoC!
Sources for Inspiration and Help Pushing the Community Forward!
- Tom Jobbins
- Georgi Gerganov
- HuggingFace
- LAVIS
- Stable Diffusion
- LocalLLaMAs
- LLama.cpp
- Weights and Biases
Getting Started
Extract, Generate, Reuse and Predict new Generative AI Model Weights for LLMs or Text-to-Image or Image-to-Image or Text-to-Audio or Audio-to-Audio Models
Download a model.safetensors file
This version only supports model.safetensors files downloaded from GPTQ models on the HuggingFace leaderboard.
As of 2023-11-17 here are some of the current GPTQ model leaders and most-downloads that include a huge file with the pre-trained weights (download the model.safetensors file).
The below model is good for a lightweight PoC (weight is ~6.8 MB):
Larger examples we are already using:
# wget https://huggingface.co/TheBloke/Llama-2-7B-Chat-GPTQ/resolve/main/model.safetensors
# wget https://huggingface.co/TheBloke/Llama-2-70B-Chat-GPTQ/resolve/main/model.safetensors
wget https://huggingface.co/gpt2/resolve/main/model.safetensors
Install
Clone
git clone https://github.com/matlok-ai/bampe-weights
cd bampe-weights
Install
Install the latest pip:
pip install bampe-weights
Or install the development build:
pip install -e .
Supports GPU or CPU
Current Performance Benchmarks
Customizable weight prediction sizes based off resource constraints (IoT, embedded devices will have different profiles)
| Use Case | Size | Time | Hardware |
|---|---|---|---|
| small | ~780 KB | 13s | cpu-only on m2 SSD m2 |
| small | ~780 KB | 40s | cpu-only on SAS hdd |
| medium | ~3 mb | 120s | cpu-only on m2 SSD |
| large | ~5-12 mb | >3m | cpu-only on SAS hdd |
| large | ~5-12 mb | 30s | gpu-only on SAS hdd |
Notes:
- Testing shows you can generate a 5-12 MB chunk of predicted weights in ~30s on an Nvidia 4070 ti.
- By default the included examples run on cpu, but if you have a gpu the examples will run faster by setting this environment variable before starting:
export DEVICE=cuda
Extract Weights
By default this will extract to the ./npy/weights directory.
time ./examples/step-1-extract-tensors.py
Convert Weights to Tiff Format
By default this will store the new Tiff file in the ./tiff directory.
time ./examples/step-2-convert-npy-to-tiff.py
Predict LLM Weights using Stable Diffusion
By default this will store the new LLM weight chunk bufffer Tiff file in the ./chunks directory. If you have not run this before, the command will download the ~8GB Salesforce BLIP-2 generative ai image model (image2image) from HuggingFace.
Note: I included more detailed benchmarks in the ./examples/step-3-generate-model-weight-chunk-as-tiff.py script. Hopefully other hardware has consistent performance with this gaming machine running wsl2 Ubuntu 22.04 with python 3.11.
Predicting ~780 KB of new Generative AI model tensor weights using Stable Diffusion on CPU
Predictions on SSD takes 13 seconds
time ./examples/step-3-generate-model-weight-chunk-as-tiff.py
2023-11-17 12:00:47.212 INFO generators - run_stable_diffusion_to_generate_model_weight_layer_as_image - loading Salesforce/blipdiffusion gen ai pipeline on device=cpu prediction with num_inf=3 buffer size width=512 height=512
vision_encoder/model.safetensors not found
Loading pipeline components...: 100%|█████████████████████████████████████████████████████████████████████████| 7/7 [00:02<00:00,  2.56it/s]2023-11-17 12:00:50.502 INFO generators - run_stable_diffusion_to_generate_model_weight_layer_as_image - loading image=./tiff/idata__h.0.attn.c_attn.weight.tiff gen 512x512 prompt=
100%|█████████████████████████████████████████████████████████████████████████████████████████████████████████| 4/4 [00:05<00:00,  1.43s/it]2023-11-17 12:00:59.750 INFO generators - run_stable_diffusion_to_generate_model_weight_layer_as_image - saving chunk to: ./chunks/predicted-model-weights__layer__h.0.attn.c_attn.weight__chunk__0.tiff
2023-11-17 12:00:59.750 INFO generators - run_stable_diffusion_to_generate_model_weight_layer_as_image - output[0]=<PIL.Image.Image image mode=RGB size=512x512 at 0x7F97912B7D90>
2023-11-17 12:00:59.764 INFO step-3-generate-model-weight-chunk-as-tiff - <module> - done predicting new llm weights - please compare
source tensor weight image file:
./tiff/idata__h.0.attn.c_attn.weight.tiff
to the predicted weights file by the generative image ai model:
./chunks/predicted-model-weights__layer__h.0.attn.c_attn.weight__chunk__0.tiff


real    0m13.522s
user    1m43.081s
sys     0m9.837s
Predictions on SAS hard drive takes ~40 seconds
2023-11-17 17:16:52.699 INFO generators - run_stable_diffusion_to_generate_model_weight_layer_as_image - loading Salesforce/blipdiffusion gen ai pipeline on device=cpu prediction with num_inf=3 buffer size width=512 height=512
vae/diffusion_pytorch_model.safetensors not found
Loading pipeline components...: 100%|████████████████████████████████████████████████████████████████████████████████████████████████████████████████████████████████████████████████| 7/7 [00:09<00:00,  1.33s/it]2023-11-17 17:17:03.005 INFO generators - run_stable_diffusion_to_generate_model_weight_layer_as_image - loading image=./tiff/idata__h.0.attn.c_attn.weight.tiff gen 512x512 prompt=
  0%|                                                                                                                                                                                        | 0/4 [00:00<?, ?it/s][W NNPACK.cpp:64] Could not initialize NNPACK! Reason: Unsupported hardware.
100%|████████████████████████████████████████████████████████████████████████████████████████████████████████████████████████████████████████████████████████████████████████████████| 4/4 [00:14<00:00,  3.66s/it]2023-11-17 17:17:28.070 INFO generators - run_stable_diffusion_to_generate_model_weight_layer_as_image - saving chunk to: ./chunks/predicted-model-weights__layer__h.0.attn.c_attn.weight__chunk__0.tiff
2023-11-17 17:17:28.070 INFO generators - run_stable_diffusion_to_generate_model_weight_layer_as_image - output[0]=<PIL.Image.Image image mode=RGB size=512x512 at 0x7F634949B7D0>
2023-11-17 17:17:28.377 INFO step-3-generate-model-weight-chunk-as-tiff - <module> - done predicting new llm weights - please compare
source tensor weight image file:
./tiff/idata__h.0.attn.c_attn.weight.tiff
to the predicted weights file by the generative image ai model:
./chunks/predicted-model-weights__layer__h.0.attn.c_attn.weight__chunk__0.tiff


real    0m39.590s
user    7m20.328s
sys     2m18.198s
Predicting 12 MB of new Generative AI model tensor weights using Stable Diffusion on GPU in 33 seconds
For the demo GPT 2 model, this usually is more LLM tensor weights than the original seed tensor weight data (6.8 mb was used to predict ~11.8mb)
export DEVICE=cuda; time  ./examples/step-3-generate-model-weight-chunk-as-tiff.py
2023-11-17 12:04:20.558 INFO generators - run_stable_diffusion_to_generate_model_weight_layer_as_image - loading Salesforce/blipdiffusion gen ai pipeline on device=cuda prediction with num_inf=3 buffer size width=2000 height=2000
vision_encoder/model.safetensors not found
Loading pipeline components...: 100%|█████████████████████████████████████████████████████████████████████████| 7/7 [00:02<00:00,  3.20it/s]2023-11-17 12:04:23.932 INFO generators - run_stable_diffusion_to_generate_model_weight_layer_as_image - loading image=./tiff/idata__h.0.attn.c_attn.weight.tiff gen 2000x2000 prompt=
100%|█████████████████████████████████████████████████████████████████████████████████████████████████████████| 4/4 [00:03<00:00,  1.23it/s]2023-11-17 12:04:52.293 INFO generators - run_stable_diffusion_to_generate_model_weight_layer_as_image - saving chunk to: ./chunks/predicted-model-weights__layer__h.0.attn.c_attn.weight__chunk__0.tiff
2023-11-17 12:04:52.293 INFO generators - run_stable_diffusion_to_generate_model_weight_layer_as_image - output[0]=<PIL.Image.Image image mode=RGB size=2000x2000 at 0x7FD65B68BED0>
2023-11-17 12:04:52.304 INFO step-3-generate-model-weight-chunk-as-tiff - <module> - done predicting new llm weights - please compare
source tensor weight image file:
./tiff/idata__h.0.attn.c_attn.weight.tiff
to the predicted weights file by the generative image ai model:
./chunks/predicted-model-weights__layer__h.0.attn.c_attn.weight__chunk__0.tiff


real    0m33.368s
user    0m32.405s
sys     0m5.949s
Linting
black --line-length 60 *.py bw/*/*.py examples/*.py
Coming Soon
- Build a foundational model with a File transformer that can predict any type of file contents (llm tensor weights are just the first use case - json/tcp/protocols should work too)
- Use the file transformer to build new model weights for model weight reassembly and testing
- Support for GGUF/bin and other model file formats. I have a poc using llama.cpp GGUF, but it is not ready for release due to how the quantization process works. It made me worried that additional byte-level compression would invalidate this early approach.
Learn More
Who made this?
Made with <3 by smooth-brained ai models,
Hakinge and Bampe
Reach out if you want to catch up and thanks for reading,
hello@matlok.ai